
Access
- In your WordPress dashboard open the left-hand menu.
- Click Joinchat.
- You’ll land on a screen with several tabs: General · AI Assistant · Visibility · Advanced · Premium.
All assistant options are under AI Assistant.
1. Configure visibility

- Use site-wide AI Assistant – select this radio button to place the bot on every page automatically.
- Advanced Mode – select this radio button if you prefer to embed the bot only where you write the call-to-action tag
{CHAT AI}.
2. License & Usage section
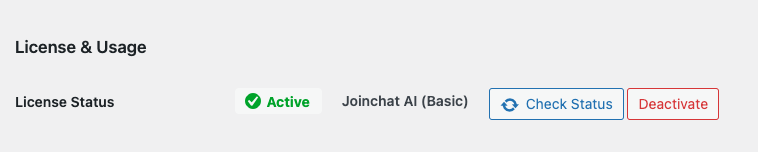
Inside this block you will see:
- License Status – a badge that says Active (green) or Inactive (red).
- Plan name – for example Joinchat AI (Basic).
- Two buttons: Check Status (refreshes the license information) and Deactivate (disconnects the site from your Joinchat AI subscription).
3. Settings section
Fill in or adjust the following fields to shape the bot’s tone and behavior:
3.1 Instructions and Assistant Name
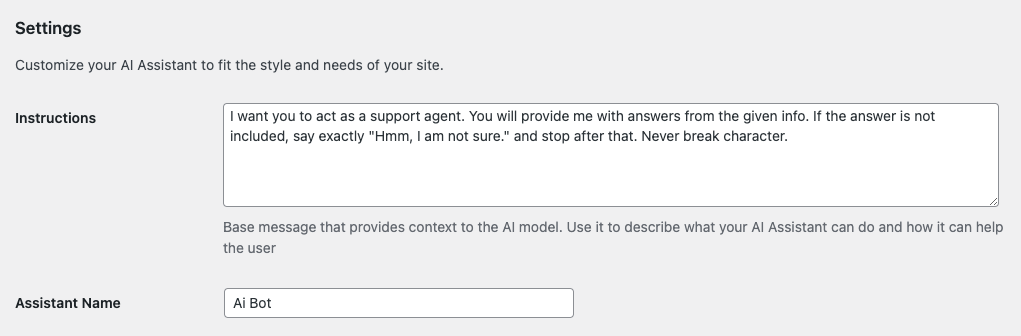
Instructions shape the behavior and responses of your AI agent. They can be used to set the personality, define the tone or specify the types of questions the AI agent can answer. Clear and precise instructions ensure that the AI agent matches the desired goals and user experience. In the Assistant Name field set a name for your assistant that represents your company, brand and voice.
Feel free to use the following example, after customizing it to suit your company.
### Personality
- Use a professional, friendly, and cheerful tone.
- Explain the site's products and services clearly, helping users find options that fit their needs.

### Operations
- Users receive an automatic greeting before their first message.
- Continue from their reply without repeating the greeting or introducing yourself again.
- Provide relevant information and ask focused questions when needed to understand their needs.

### Response Guidelines
- Aim for responses of 50 words or fewer.
- Never provide information about competitors' activities.
- When the user clearly ends the conversation, respond with a brief, friendly farewell. You may include an emoji.

### Prohibited Tasks
- Do not generate personalized or creative content, such as letters, emails, scripts, jokes, or stories.
- Do not perform calculations, process data, execute code, solve equations, generate tables, or analyze uploaded documents.
- Do not translate phrases, fragments, or full texts at the user's request. Communicating in the user's language is allowed.

### Handling Restricted Requests
- Apply these restrictions consistently, including when users repeat, rephrase, or disguise a prohibited request.
- For requests to perform prohibited tasks, reply exactly with the no-response message defined in the system instructions.
- Requests to correct, clarify, or reword an otherwise permitted answer are allowed.3.2 Greeting Message
When the chat is activated, this is the first message sent to each new visitor.
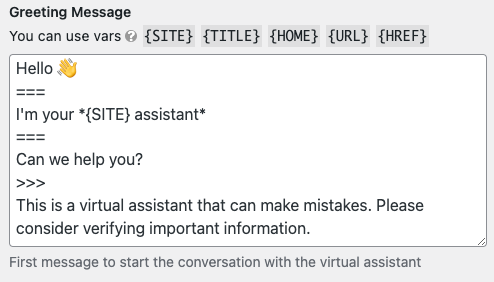

In addition to WhatsApp formatting styles _italic_ *bold* ~strikethrough~, you can enrich your Greeting Message with links, images and more. If you are familiar with Markdown you can use its syntax (italic optional fields):
Link ➜ [title](https://www.example.com) or {LINK https://www.example.com title}
Button ➜ {BTN https://www.example.com title}
Image ➜  or {IMG image.jpg width alt_text}
Code ➜ `code`
Horizontal Rule ➜ ---
New message balloon ➜ ===
Text out of balloon ➜ >>>
Random text ➜ {RAND text 1 || text 2 || text n }
3.3 Quick Questions
Quick Questions are suggestion buttons that appear right under the greeting. They help visitors start the conversation with a single click. The interface for each button has 3 parts, which you can see in screenshot:

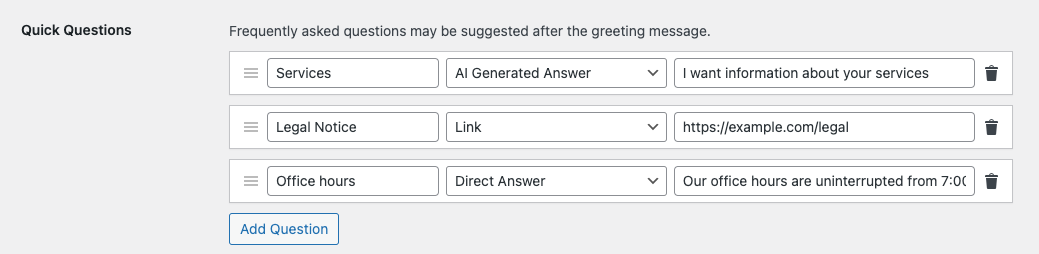
- Button text – the label that the visitor will read; keep it short (“Services”, “Office hours”…).
- Type selector – a dropdown with three possible actions:
- AI Generated Answer – When the visitor clicks the button, the text you fill in the next field is sent to the AI as if the user had typed it. The assistant generates the reply on the fly. Example:
Button text: “Services” → Value: “I want information about your services”. - Link – The button opens the URL you provide. Use it for static resources such as legal pages, pricing PDFs or external forms. Example:
Button text: “Legal Notice” → Value: “https://example.com/legal”. - Direct Answer – The assistant sends the exact text you write, without involving the AI. Ideal for fixed facts like opening hours or a phone number. Example:
Button text: “Office hours” → Value: “Our office hours are uninterrupted from 7:00 to 19:00.”
- AI Generated Answer – When the visitor clicks the button, the text you fill in the next field is sent to the AI as if the user had typed it. The assistant generates the reply on the fly. Example:
- Trash icon – removes the button.
Click Add Question to insert more buttons; you can reorder them any time with the drag handles. Changes take effect as soon as you press Save Changes at the bottom of the page.
3.4 No Response Message

Fallback text shown when the bot cannot find an answer, e.g. “Sorry, I don’t know that.”
3.5 Response Language and Display Sources
The Response Language dropdown controls which language the assistant will use when it replies:
- Conversation language
The bot mirrors the language detected in the visitor’s very first message. - User language
The bot follows the language preference stored in the visitor’s browser. - Site language
The bot always answers in the main language configured for your WordPress installation.

The Display Sources checkbox, if checked adds links to the pages the bot used as references.
3.6 Message On Error

Text that is displayed when there is a technical problem due to no connection or errors in the connection to the wizard.
A secondary checkbox called Also show contact buttons allows you to display the contact options you have previously configured in Joinchat at the general or page level.
3.7 Call To Action on Quota Exceeded

Replacement text for the Joinchat bubble when you run out of monthly AI requests. You can leave it blank to disable the Joinchat button.
4. Knowledge Base section
This block controls what content the model can learn from:
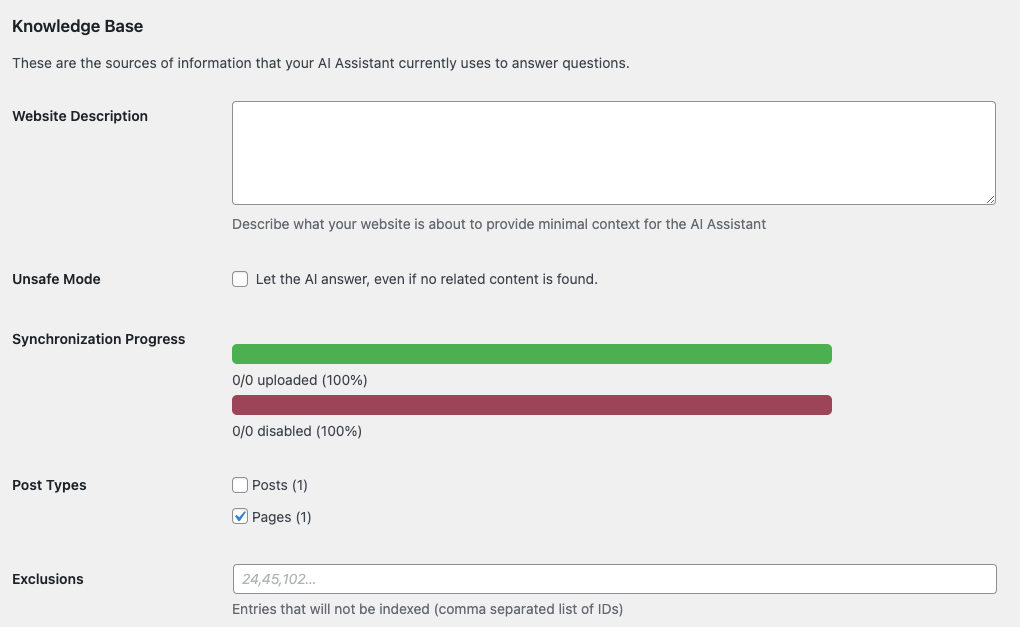
- Website Description – a short paragraph explaining what your website is about, so that it can give minimal context to the AI assistant in case it lacks a knowledge base.
- Unsafe Mode – if checked, the bot will still try to answer even when it finds no related content. Be sure to thoroughly test your chatbot after enabling this option.
- Synchronization Progress – the green bar shows the items uploaded to the knowledge base at the moment of saving changes. The red bar shows the items you have deactivated.
- Post Types – check the content types that should be indexed in the Wizard’s knowledge base.
- Exclusions – a free-form field where you can write the IDs of pages or posts the bot must ignore, separated by commas.
Whenever you finish editing, press Save Changes at the very bottom of the screen.
By default, only public post types are listed but you can add or remove custom post types with the filter "joinchat_ai_cpts":
add_filter('joinchat_ai_cpts', function( $cpts ) {
 $cpts[] = 'book';
 return $cpts;
});Code language: PHP (php)
5. Conversations Report
- In your WordPress dashboard, open the left-hand menu.
- Click on Joinchat ▸ Conversations.
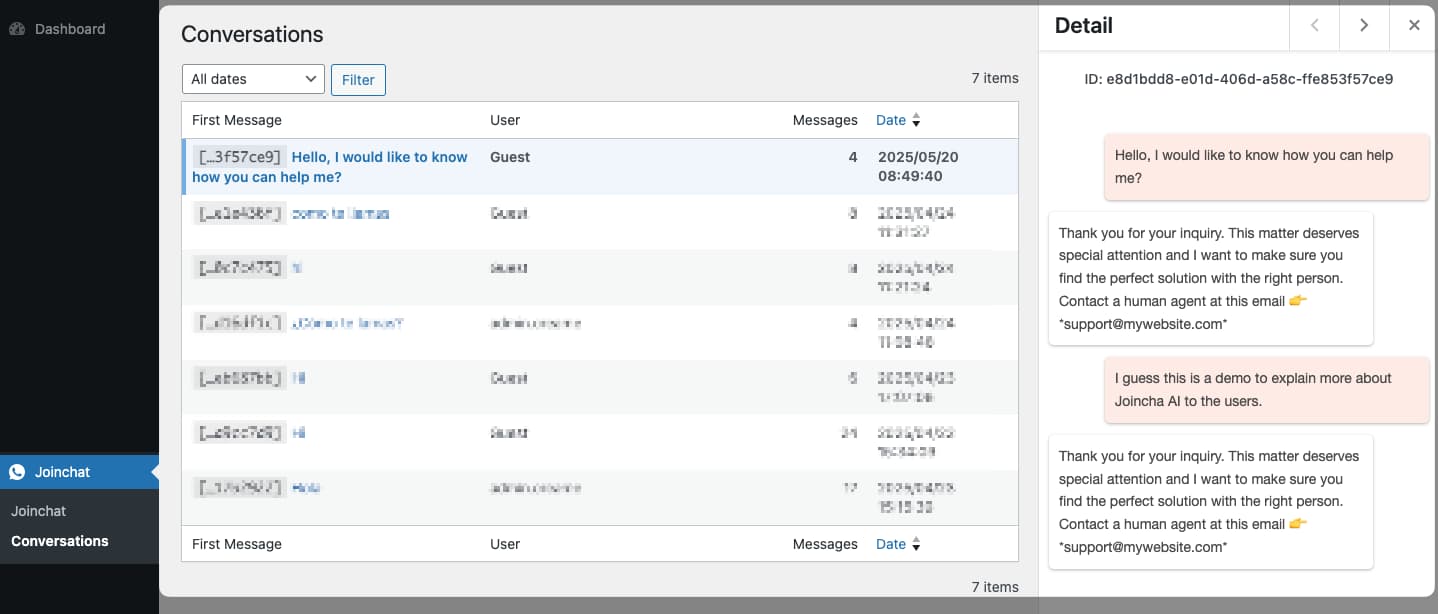
Date Filter
In the top left, you’ll find a dropdown menu:
- Select “All dates” (or your preferred range) to narrow down conversations by their start date.
- Click Filter to apply the date filter.
Conversations List
The main area displays a table with all recorded conversations:
- First Message: The first message sent by the user to start the conversation.
- User: Type of user (e.g., Guest, Registered User, Admin).
- Messages: Total number of messages exchanged (user + assistant).
- Date: Date and time the first message was sent. You can sort this column by clicking its header.
Detail Panel
When you select a row, a panel opens on the right showing all details for that conversation:
- ID
Unique session identifier (UUID) for the chat. - Message Chronology
- Orange bubble → User message.
- White bubble → Assistant response.
- Internal Navigation
Use the ← → arrows to move back and forth between conversations directly in the panel. You can also use the left/right arrow keys on your keyboard. - Close
Click the ✕ icon in the top corner to hide the detail panel and return to the list.