
Chat Funnel | Chat Funnel +
| Chat Funnel | Chat Funnel + | |
|---|---|---|
| Create Steps |  | |
| Capture fields (text, number, email, phone, date, time, option) | | |
| Share contact (handoff to WhatsApp, Telegram, etc.) | | |
| Trigger Actions (Webhook, Google Ads Conversion, Submit) |  | |
| Email notification for each lead and its details | | |
| Advanced analytics tracking | | |
| Campaign tracking (UTMs and GCLID) | | |
What is a Chat Funnel?
Chat Funnels changes the way you build chatbots in WordPress. As a powerful conversational marketing tool, it gives you a way to guide your website visitors through a support and sales flow that’s fully automated and personalized. The goal: turn more leads into happy, engaged customers.
Chat Funnel conversations aren’t generic; they’re designed to be fully customizable based on context—whether it’s a specific page, a product, or a category.
Use Chat Funnels and see how effective interactions can change the dynamics of your online business, delivering a richer, more personalized experience for every visitor.
Overview video
Activating Chat Funnels
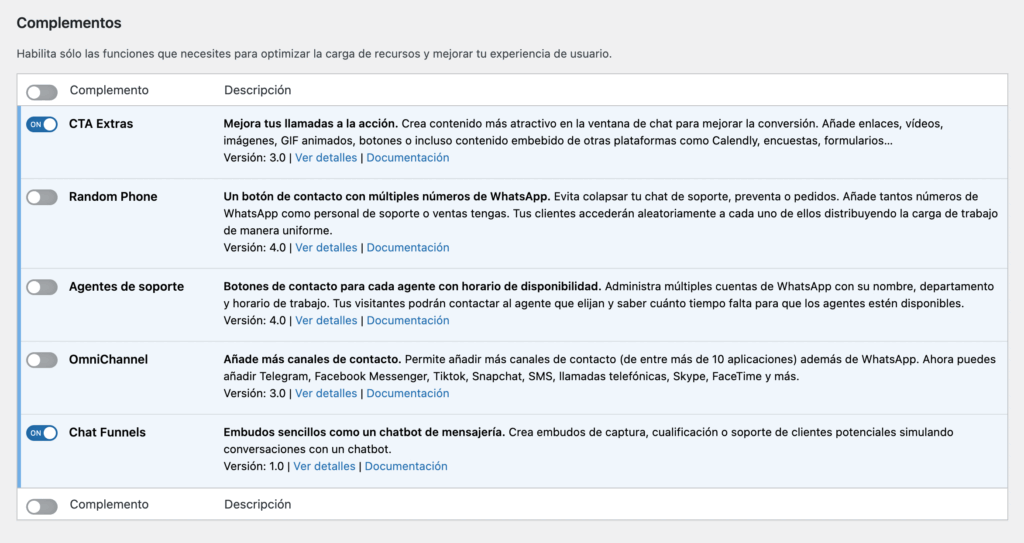
To add and configure your chatbots using conversational flows, go to your WordPress dashboard menu Joinchat > Settings > Premium and enable the Chat Funnels add-on by switching it ON.
Chat Funnels templates
NOTE: You can view and download more templates from our gallery.
In the WordPress dashboard, go to the left sidebar menu, Joinchat > Chat Funnels.
By default, we’ve created three example templates that we recommend reviewing and using as a starting point for new chatbots.
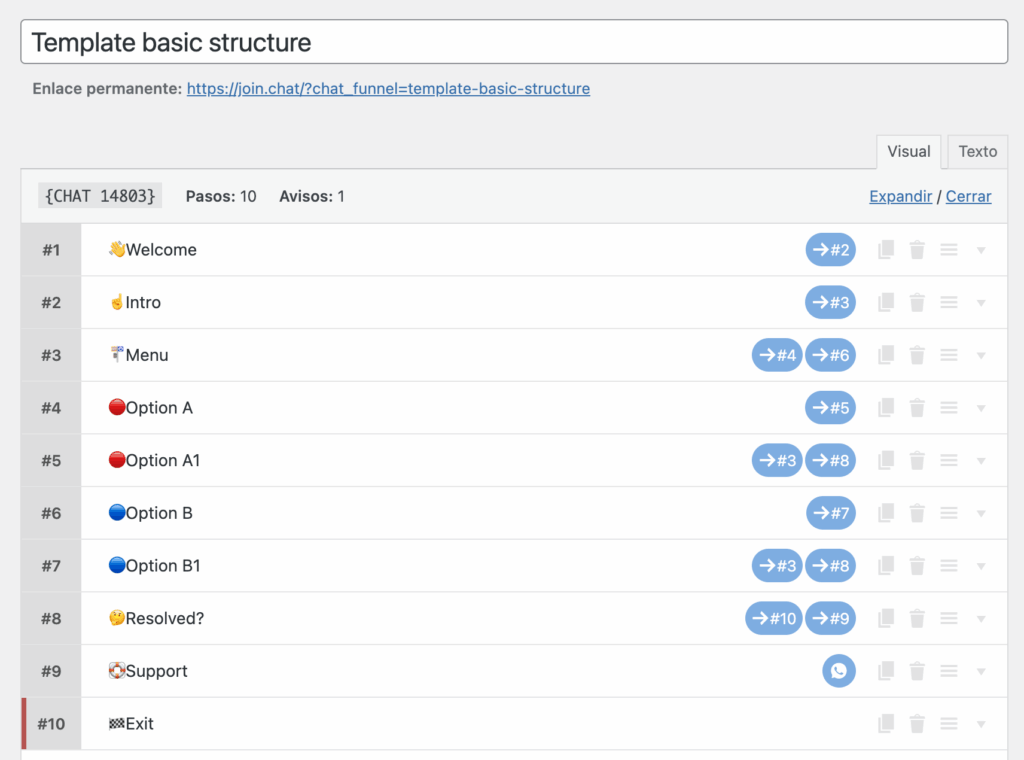
The “Basic Structure” template gives you an overview of the steps your chatbot should include. You’ll see there are 10 steps in total, described and identified by their purpose. You can edit and add new steps starting from this template.
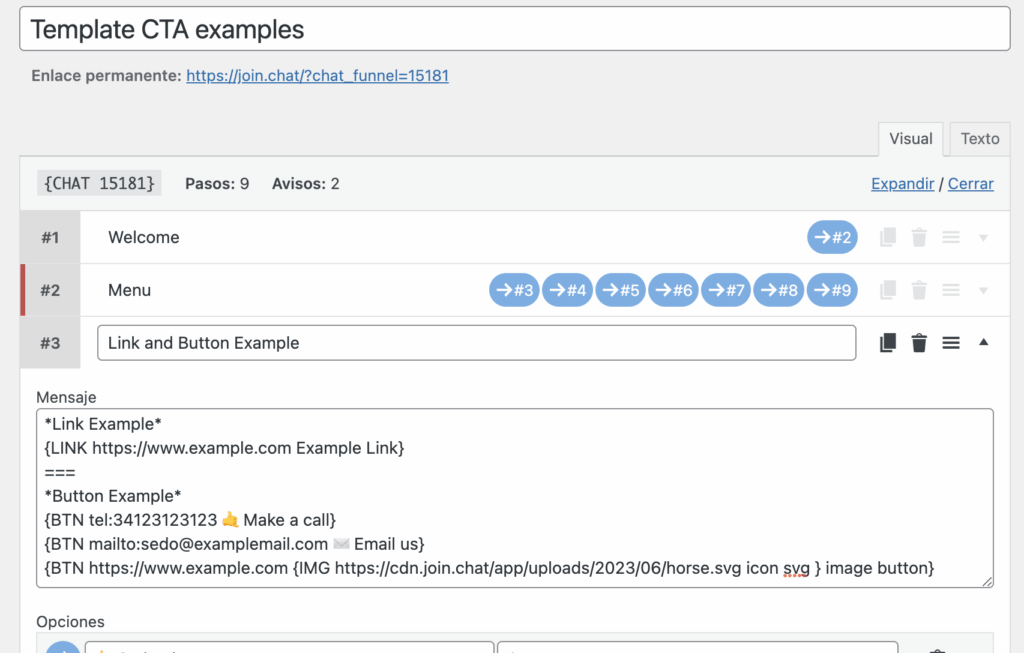
The “CTA Examples” template is a showcase of the different options you can use to build your messages or integrate external tools. In each step, you’ll find usage examples and features showing how to add buttons, links, images, videos, or iframes—even random text so your chatbot doesn’t sound repetitive.
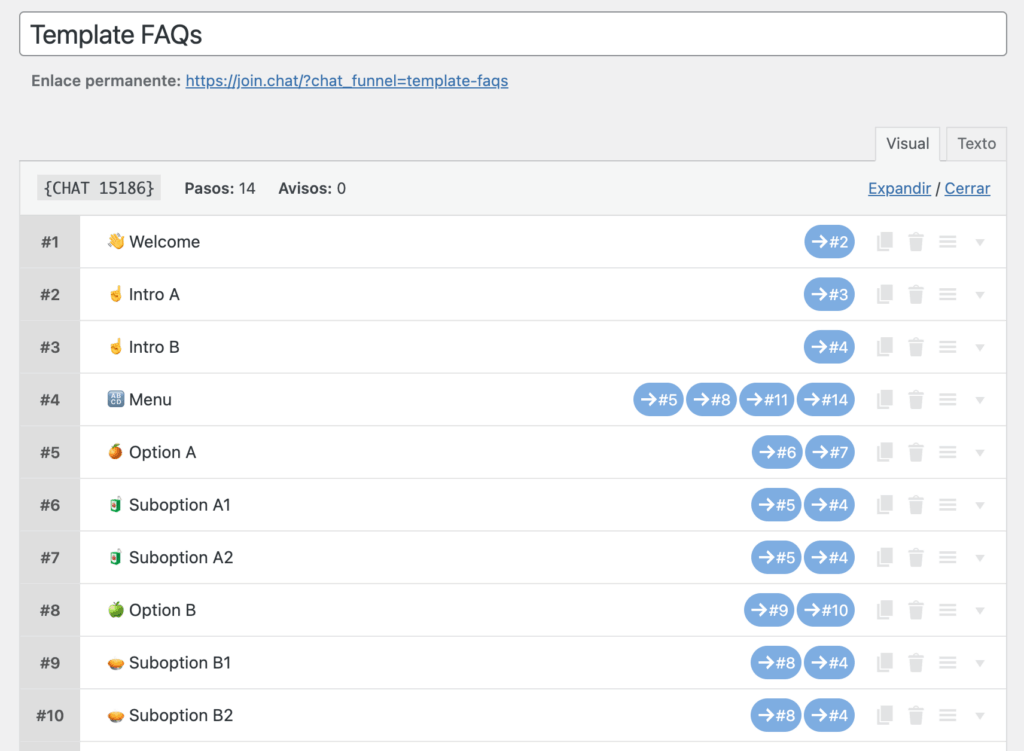
In the “FAQs” template you’ll find a ready-made foundation for a chatbot that answers frequently asked questions, with two levels of depth. You can simplify or expand this template depending on how many categories and questions you need.
Workspace
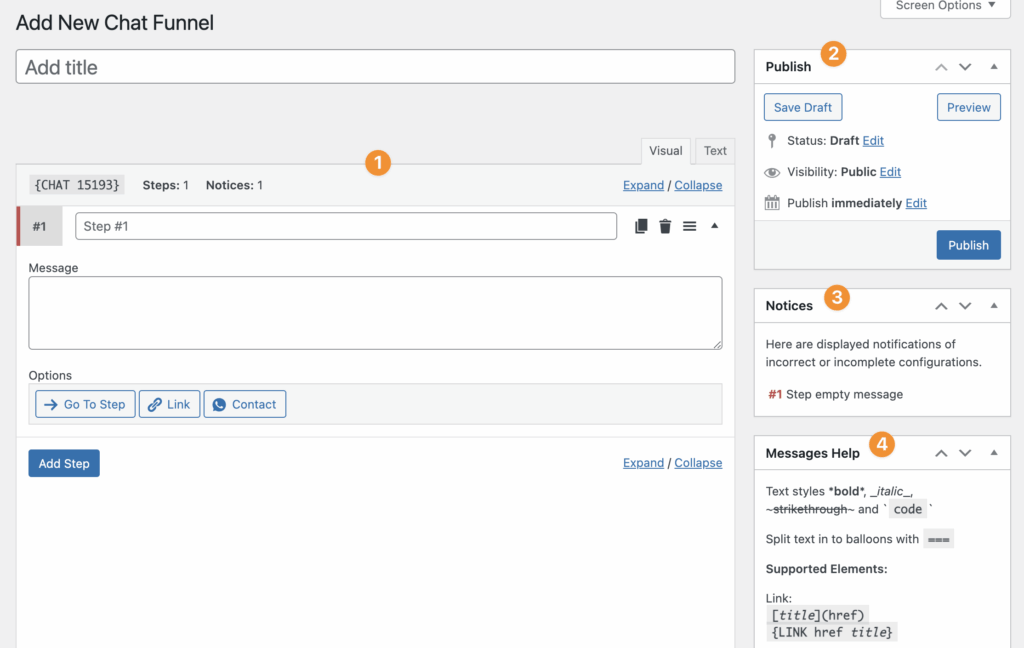
The first thing we’ll do is create a new Chat Funnel from the Joinchat menu in WordPress. Click “Add Chat Funnel”, then enter a title and publish your chat funnel.
- The main area is the editor, where you can add steps and define their settings and behavior, as well as copy your chatbot’s shortcode so you can publish it inside Joinchat’s chat window. By default, it starts with the first step already created.
- On the right, the Publish panel is the standard WordPress block and lets you preview your chatbot.
- The Notices panel warns you about potential issues in your chat funnel. Keep in mind they’re not always actual errors, but it helps you review your chatbot.
- Message help is a panel where you can see the supported styles and elements for the message field in each step you define in your chat funnel. It’s basically the same set that was previously available in the CTA Extras add-on.
Editing a Chat Funnel
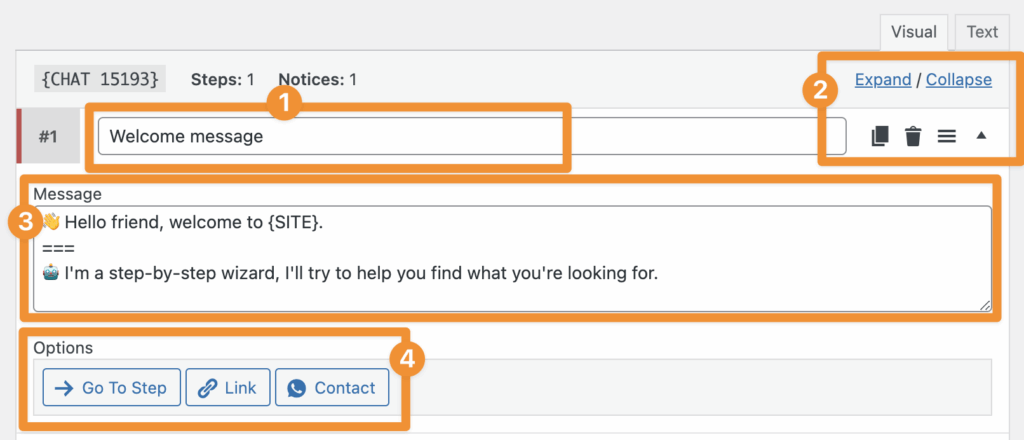
- Here you set the title of this step—try to keep it short and descriptive. You can use emojis if you want a visual guide for your steps.
- Here you can collapse or expand all steps to make them easier to view, or drag steps to reorder them. There’s also a row with 4 buttons: the first icon duplicates the step, another deletes it (for safety, it requires three clicks since this action can’t be undone), another lets you move (Drag & Drop) the step to a different position, and finally one collapses just this step.
- This is where you write the message for the current step. It can be a simple text, but remember you can use multiple styles and elements—everything is available and explained in the right-side panel we saw earlier. In the next example, we send a first bubble with the welcome message using the
{SITE}variable, followed by a second bubble (separating the text with===). - There are three general options for steps: go to another step, add a link to another page or URL, and contact, which shows whatever channels you’ve configured in Joinchat.
You can add as many steps as you need, combining the three options and whatever messages you need. It all depends on the type of flow you want to build.
Publishing your Chat Funnel
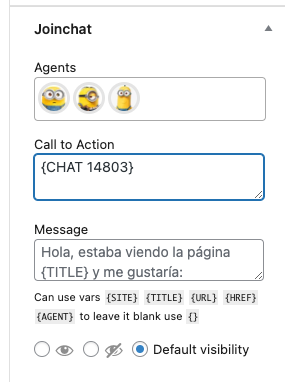
Once your Chat Funnel is designed, it’s time to put it to work on your website.
Each funnel has a shortcode like {CHAT 14803}. Copy it and paste it into Joinchat’s call-to-action window—either in the global settings or on a specific page or product.
As you can see, you don’t need to write a single line of code. You can build anything from a simple flow to a complex bot that answers FAQs—it all depends on your specific needs.
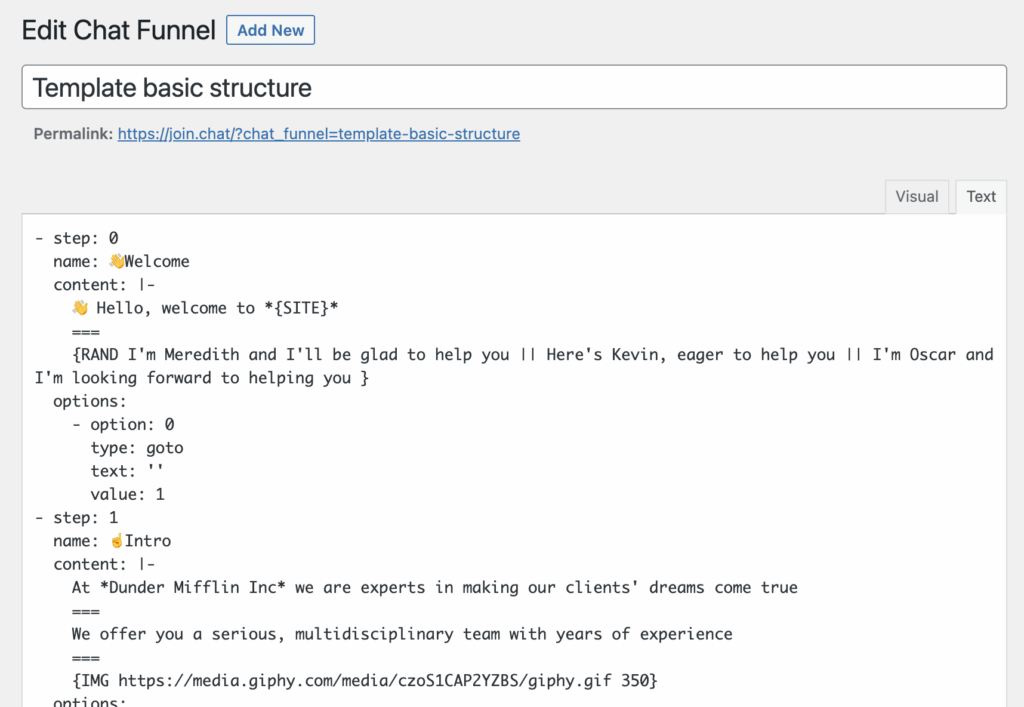
If you still feel like checking the code, just go to the Text tab and you’ll be able to edit, copy, or paste the entire chatbot from there.
Translating your Chat Funnel
Creating translations for your Chat Funnel is easy. The first thing you should do is create one Chat Funnel per language.
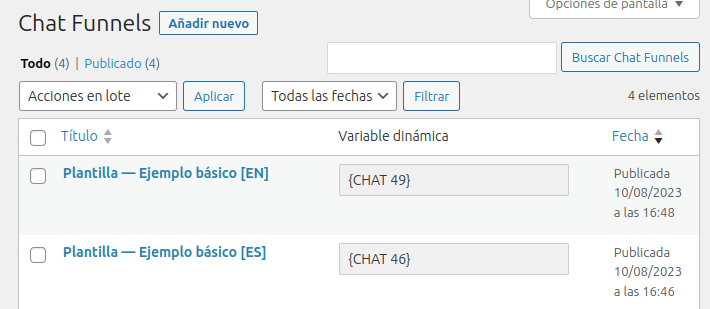
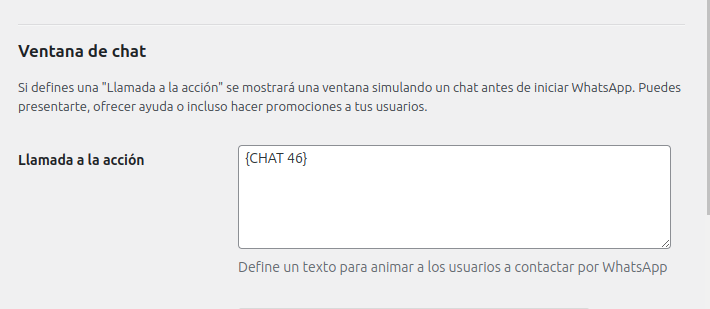
Once you’ve created them, assign the funnel for your site’s main language in Joinchat settings (in our example, Spanish):
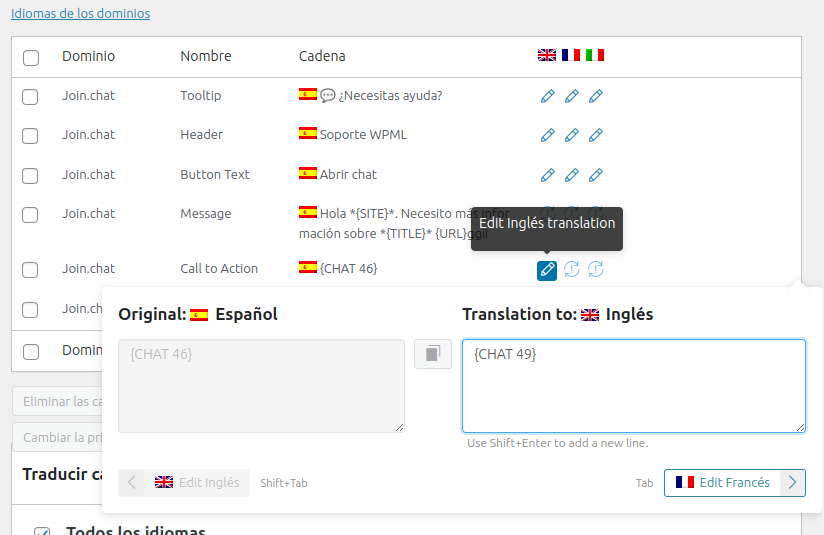
Finally, in Joinchat translations under “Call to Action”, assign the corresponding Chat Funnel to each language:
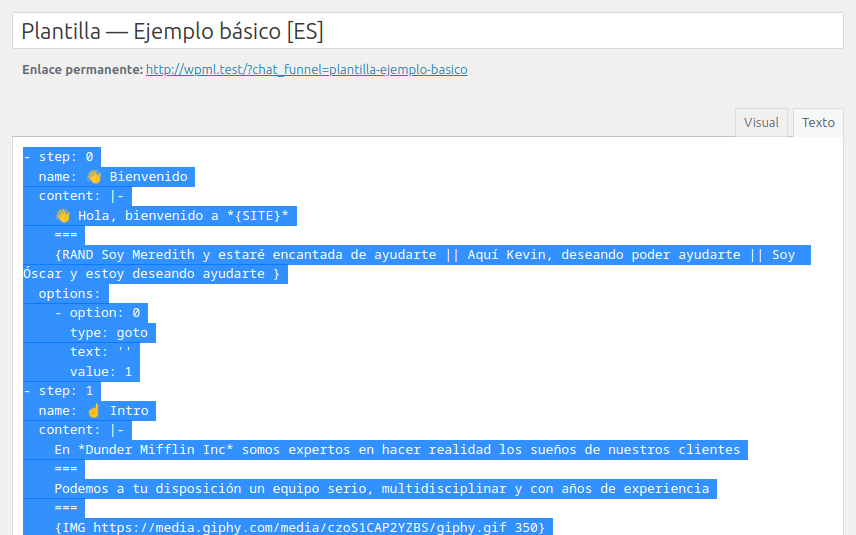
☝️ Tip: The easiest way to duplicate a Chat Funnel is to edit the original, click the Text tab, select everything, copy, and paste it into a new Chat Funnel. Then save and you’re done. Translating can also be more convenient in the text format, but be careful not to break the structure.
NOTE: From this point on, you’ll need Joinchat Premium with Chat Funnels (+). It’s only included with the Personal +, Freelance, Team and Agency licenses of Joinchat Premium.
What is a Chat Funnel (+)?
Chat Funnels (+) expands what Chat Funnels can do by adding “inputs”—fields the visitor can fill out—and “actions” that can be triggered as the visitor progresses through the funnel.
It turns Chat Funnels into powerful, engaging conversational forms to capture lead data or route visitors to the right results page based on their choices.
Activating Chat Funnels (+)
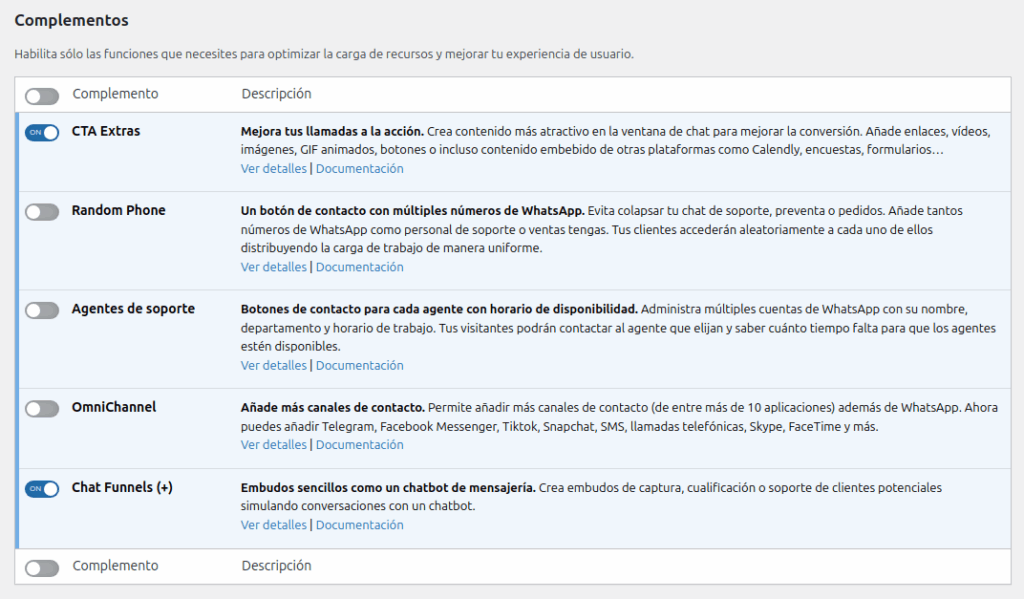
To add and configure your chatbots using conversational flows, go to your WordPress dashboard menu Joinchat > Settings > Premium and enable the Chat Funnels (+) add-on by switching it ON.
Inputs
Inputs are steps that work like fields the visitor must fill out to continue the conversation flow.
The input value is saved into a variable like {{input_name}} and can later be used in the text of subsequent steps, in links, or as fields in webhooks.
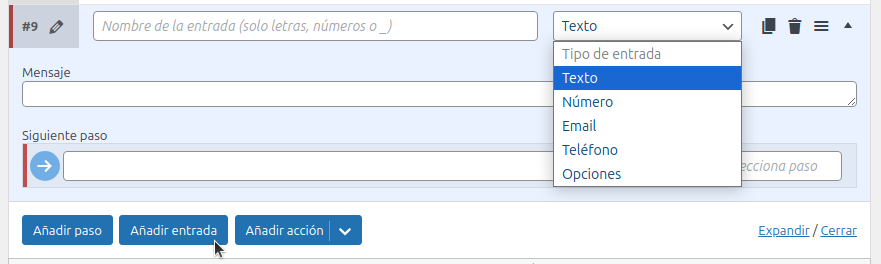
Input types:
- Text: free text
- Number: numeric values
- Email: email address
- Phone: phone number
- Date: separate fields for day, month, and year
- Time: fields for hour and minutes in 24-hour format
- Options (select): choose one option among several. These options can also save a value and send the visitor down one path or another within the flow.
Using variables in Chat Funnels
Variables captured through inputs can be used in multiple places within your Chat Funnel, enabling highly personalized experiences.
Where you can use variables
- In messages in later steps: Personalize the conversation using the captured data
- Example: “Perfect, {{nombre}}, we’ll reach out to you at {{email}} to confirm your appointment on {{fecha_cita}} at {{hora_cita}}.”
- In option labels: Options can display captured information
- Example option label: “Confirm appointment for {{nombre}}.”
- In link URLs: Create dynamic links that include visitor data
- Example:
https://tupagina.com/confirmacion?nombre={{nombre}}&email={{email}}&fecha={{fecha_cita}}
- Example:
- In webhooks: In both the payload and custom parameters
- Example custom field:
mensaje_personalizado:Cita solicitada por {{nombre}} para el {{fecha_cita}}
- Example custom field:
- In WhatsApp messages: When using the “Contact” option with a custom message
- Example: “Hi, I’m {{nombre}} and I’d like more info about {{servicio}}.”
Variable format
Variables are always written inside double curly braces: {{variable_name}}
- The name must match exactly the name you gave the input
- They’re case-sensitive
- If the variable doesn’t exist or is empty, the literal text (including the braces) is shown
JavaScript event for capturing inputs
When a visitor completes an input field, the JavaScript event joinchat:input is triggered. You can listen for it to run additional actions:
document.addEventListener('joinchat:input', function(event) {
  console.log('Captured field:', event.detail.name);
  console.log('Value:', event.detail.value);
  console.log('Type:', event.detail.input);
});Code language: JavaScript (javascript)
This makes it possible, for example, to send data to analytics tools, fire partial-conversion pixels, or run custom validations. View JavaScript events doc
Actions
Actions are steps that work as triggers for an action and then continue the conversation flow.
There are currently three types: Webhook, Google Ads conversion, and Send.
Webhook
Webhooks let you send real-time information to other apps. They can notify that a specific event has happened so you can store that data or automate other actions (send an email, save data, create a lead, segment, etc.).
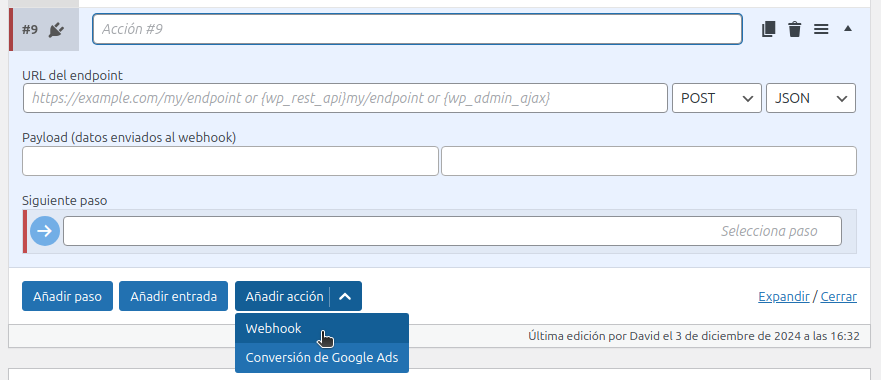
- Endpoint URL: Here you define the URL where the data will be sent. It can be an external service like Make, IFTTT, Campaign Monitor, etc., or you can easily integrate it with your own WordPress using the
{wp_rest_api}variable for the REST API and{wp_admin_ajax}for AJAX requests. - Request method: Can be
POSTorGET - Request format: Can be
Formto emulate a form submission,Textfor plain text, orJSON - Request origin: Can be sent from the
Client (browser)—the webhook runs in the user’s browser—or from theServer—the webhook is fired from the site’s server. This avoids exposing the webhook URL and helps prevent CORS issues. - Payload: The data we’ll send in the webhook. It’s split into two parts:
- Inputs: Fields collected earlier in Input-type steps. You can select only some of them or add “All inputs” to send everything.
You can also include extra fields using the formatfield_name:field_value - Metadata: Visitor and current-session data captured automatically. You can select only some, or add “All metadata” to send everything:
uuid— Chat UUID: Unique identifier for the conversation (useful for tracking and avoiding duplicates)url— URL: URL of page where the conversion happenedreferrer— Referrer: URL of the page that linked to the conversion pagetitle— Title: Web page titledate— Date: Conversion datetime— Time: Conversion timelang— Lang: Visitor’s browser languagesite_lang— Site Lang: Language configured in WordPresschat— Full chat: Full conversation log in text formatgclid— Google Click ID (GCLID): For Google Ads attribution (stored for 90 days)utm_campaign— UTM Campaign: Campaign name (e.g., “summer_promo”)utm_source— UTM Source: Traffic source (e.g., “google”, “facebook”, “newsletter”)utm_medium— UTM Medium: Marketing medium (e.g., “cpc”, “email”, “social”)utm_content— UTM Content: To differentiate similar ads or linksutm_term— UTM Term: Paid search keywords
- Inputs: Fields collected earlier in Input-type steps. You can select only some of them or add “All inputs” to send everything.
Dynamic variables in the endpoint
The Endpoint URL field now supports special variables to make it easy to integrate with your WordPress:
{wp_rest_api}– Automatically replaced with the base URL of the WordPress REST API. Example:{wp_rest_api}/my-plugin/v1/webhook{wp_admin_ajax}– Replaced with the admin-ajax.php URL for AJAX requests. Example:{wp_admin_ajax}?action=process_funnel
This makes it easier to integrate with custom plugins or your own development without having to write full URLs.
Advanced payload
In addition to captured inputs, you can add custom fields to the payload using the format field_name:field_value. For example:
lead_type:contact_formsource:landing_pagepriority:high
You can also use input variables in these values. For example: full_message:Hi {{nombre}}, thanks for your interest
NEW: Starting in version 6.4.0, webhooks can be sent from the server, which provides improved security and reliability.
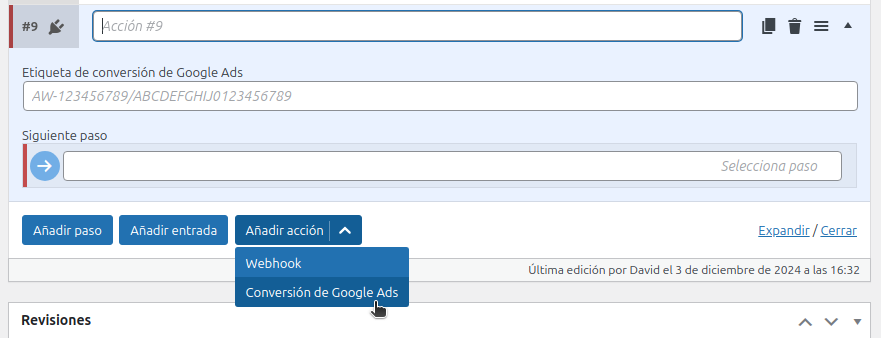
Google Ads conversion
You can send a Google Ads conversion inside the conversation flow by providing the conversion tag.
Google Click ID (GCLID)
The Google Click ID (GCLID) is a unique parameter Google uses to track and attribute where clicks come from in online advertising campaigns, mainly Google Ads. This identifier is automatically appended to destination URLs when campaigns are set up with auto-tagging.
In digital marketing, the GCLID plays a key role because it lets advertisers connect ad clicks with actions users take on their websites, like purchases, sign-ups, or any other conversion. This provides valuable data to measure ROI (Return on Investment), optimize campaigns, and make decisions based on real analytics.
Why is it important?
- Conversion tracking: GCLID helps you understand which ads, keywords, or campaigns generate results, so you can optimize ad spend.
- Analytics integrations: It makes it easier to integrate data with tools like Google Analytics or CRMs, giving you a complete view of customer behavior.
- Data-driven decisions: Accurate attribution data lets you fine-tune strategies to improve effectiveness and profitability.
- Personalization and remarketing: It helps segment audiences based on prior interactions, improving remarketing campaigns.
Using GCLID correctly ensures every click counts and that your marketing strategies are always backed by solid data.
With Chat Funnels (+), the gclid (GCLID) field is captured and stored for 90 days. Later, it can be sent via webhooks to apply proper attribution for conversions.
GCLID is automatically captured on every page where there’s a Chat Funnel. That way, if a user lands on a page from a campaign and later browses the site and converts on a different page, the stored value is recovered to ensure correct attribution.
If your campaign landing page doesn’t have a Chat Funnel, you can add the following JavaScript snippet to store the GCLID and retrieve it later inside the funnel:
window.addEventListener('load', () => {
 const params = new URL(window.location).searchParams;
 const gclid = params.get('gclid');
 const gclsrc = params.get('gclsrc');

 if (gclid && (!gclsrc || gclsrc.indexOf('aw') !== -1)) {
 localStorage.setItem('gclid', JSON.stringify({
 value: gclid,
 expiry: new Date().getTime() + 90 * 24 * 60 * 60 * 1000 // 90 days
 }));
 }
});Send (Save data)
The Send action is a powerful Chat Funnels (+) feature that lets you store all captured data directly in your WordPress without needing to set up external webhooks. It’s ideal for capturing leads, saving inquiry records, or storing visitor information in a simple, effective way.
To save your Chat Funnel data, just add a Send action and configure the flow steps so the conversation passes through it.
NOTE: You don’t need to configure any endpoint or URL. The Send action automatically stores the data in your WordPress installation.
How does it work?
When a visitor reaches a step with the Send action:
- A unique UUID is generated to identify the conversation
- All inputs captured in the funnel are automatically collected
- They’re saved together with visitor metadata (URL, date, time, language, UTM parameters, GCLID, etc.)
- They’re stored in a custom WordPress table
- The conversation flow continues normally
Data that gets saved
Each funnel send includes:
Funnel inputs:
- All fields the visitor filled out. Data captured through Chat Funnels (+) inputs (name, email, phone, date, time, etc.)
Automatic metadata:
- Chat UUID: Unique conversation identifier
- Chat: Full conversation
- URL: Page where the conversion happened
- Referrer: URL of the page that linked to the conversion page
- Title: Page title
- Date and time: Timestamp of when the funnel was completed
- Language: Visitor’s browser language
- Site language: Language configured in WordPress
- Full conversation: Full chat log with the visitor
- UTM parameters: utm_source, utm_medium, utm_campaign, utm_content, utm_term (if present)
- GCLID: Google Click ID for Google Ads attribution (stored for 90 days)
Multiple “Send steps” in one flow
A very interesting feature is that you can place multiple Send steps in the same funnel and they’ll be stored as a single funnel submission. Each one adds new information incrementally. For example: a flow first collects name and email and saves it, then continues asking for more data and saves again at the end.
When a flow starts, a unique Chat UUID is created for that conversation, and every send that runs will keep adding or updating information within the same funnel submission.
Email Notification
In addition to saving Chat Funnel data in WordPress, you can receive an email notification every time a new submission is made.
To enable it, add a Submit action and activate the “Email notification” option. Once enabled, the fields required to configure the email will appear:
- From (name or email): the address that will appear as the sender of the notification. You can enter just an email address or include a name as well, for example:
My Website <wordpress@mywebsite.com>. - To: the email address that will receive the notification. You can enter multiple addresses separated by commas.
- Subject: the subject line of the email, for example:
New contact from {{name}}.
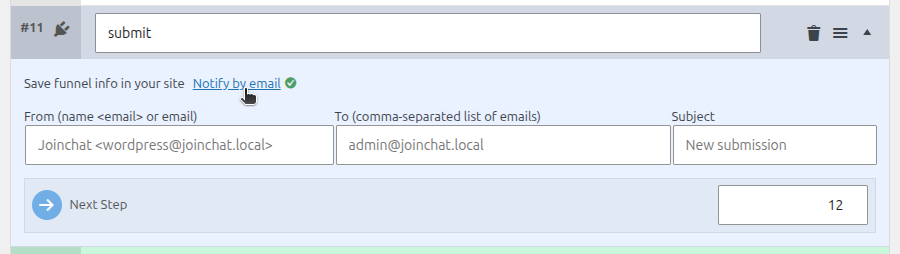
When a visitor reaches this step in the Chat Funnel, Joinchat will save the collected information and automatically send an email notification containing the data captured in the funnel and the submission details.
This allows you to know immediately when you receive a new lead, information request, booking, or any other type of conversion, without having to access the WordPress dashboard to check for new submissions.
NOTE: Email notifications are sent using the WordPress email system. To ensure reliable email delivery, we recommend properly configuring email sending on your website, preferably via SMTP.
Viewing funnel submissions
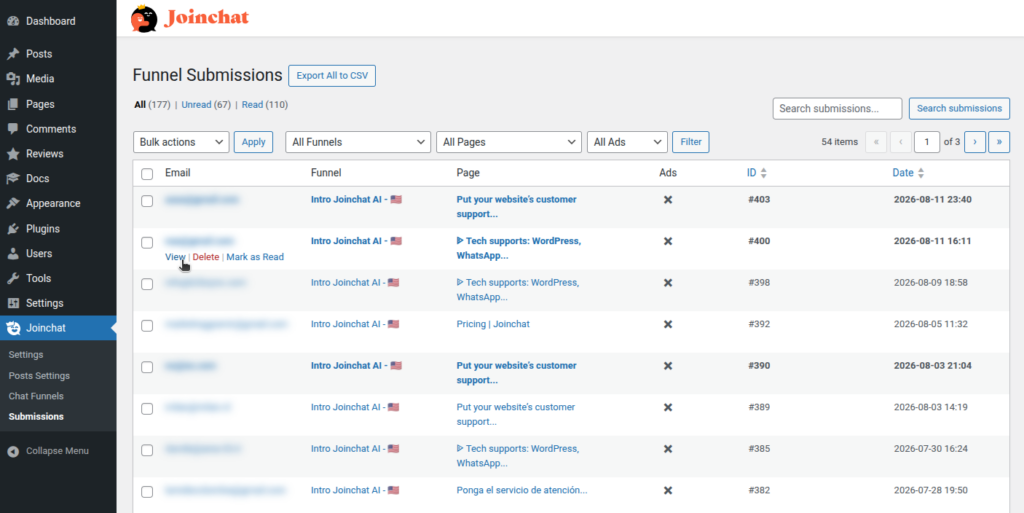
All saved funnel submissions can be viewed from your WordPress admin area:
- Go to Joinchat > Submissions in the WordPress menu
- You’ll see a list of all submissions with:
- Main captured data
- Chat Funnel name
- Source page
- Indicator if it comes from Google Ads (with GCLID)
- Submission date and time
- Click any submission to view all details
- You can export all submissions to CSV for external analysis or import into other tools
Export submissions to CSV
Starting in version 6.5.0, you can export all your funnel submissions to CSV format to analyze them in Excel, Google Sheets, or import them into other tools:
- Go to Joinchat > Submissions
- Use the filters if you want to export only specific submissions (by funnel or date)
- Click the “Export to CSV” button
- The file will download with all columns:
- All captured fields
- Metadata (URL, date, time, language)
- Campaign parameters (UTM, GCLID)
- Full chat
This is especially useful for:
- Data analysis in Excel or Google Sheets
- Importing leads into your CRM
- Periodic backups of your conversions
- Reports for clients or managers
Dashboard widget
Joinchat Premium automatically adds a widget to the WordPress dashboard showing:
- Total number of submissions
- Most recent submissions received
- Quick access to the full submissions panel
Use cases for Send
- Capture leads: Save visitor contact info without needing an external CRM
- Inquiry logging: Store FAQs or information requests
- Pre-bookings: Save data from people interested in a service before confirming
- Quick surveys: Collect visitor responses about products or services
- Event registrations: Capture sign-ups for webinars, workshops, or events
- Data backup: Use Send alongside Webhooks to keep a local backup of conversions
Combining Send with Webhooks
A powerful strategy is to use Send and Webhook in sequence:
- The visitor completes all funnel inputs
- Send step: Saves the data in WordPress (local backup)
- Webhook step: Sends the data to your CRM, email marketing tool, or external system
- Continue with the final confirmation message
This way, even if the webhook temporarily fails, the data remains stored in WordPress and won’t be lost.
Benefits of using Send
- ✅ No complex setup: No APIs or external services required
- ✅ Full control: Your data stays in WordPress, under your control
- ✅ Easy access: Quick access from the admin panel
- ✅ Flexible export: Download to CSV to use in other tools
- ✅ Automatic backup: Complements your webhooks with local storage
- ✅ Campaign attribution: Automatically stores UTM and GCLID
- ✅ Full history: Full conversation log for each lead
- ✅ Unique UUID: Each conversation has a unique identifier for tracking